


When talking about building enclosure performance, we commonly refer to control of the following elements: water, heat, and air. Controlling the free flow of these elements across and into the enclosure helps keep our buildings, and the people inside them, warm and dry. There are other important features of a building enclosure, like being nice to look at, but let’s get the performance right before we start talking about colours. One really good, proven effective way to design a wall is to design separate layers to control these elements, commonly called Control Layers.

Unfortunately, New Zealand (in general terms) hasn’t done a great job of that recently. Neither did Vancouver, or Seattle, or anywhere that is wet and at least a little cold. All these cities got one thing really wrong: thinking cladding, windows, flashings, sealants alone can keep the rain out.
Water tight cladding is a myth. This design philosophy has been proven (in at least three cities in the world, see above) to be a terrible way to design a building. You can try really, really hard to make this layer watertight but it will fail. You can make a test to prove how watertight your cladding is; doesn’t matter much. Betting all your chips on the cladding being water tight has no basis in reality. Stop trying, even though the NZ building code says you can (E2/VM1).
Instead, let this layer focus on one thing: looking really good. This is the beauty pageant layer. Accept defeat, there is no magic cladding out there that is going to stop all the water. Put more performance focus on a secondary layer, the weather resistive barrier.
Weather Resistive Barrier: controls exterior water and wind. This is the real layer that defends your building from rain water entry. This layer is the brains behind the cladding layer. This layer does all the heavy lifting the cladding never could because it doesn’t have to look that good, it just has one job, be water tight. In most cases, you want this layer to be vapour permeable (more on that below) but not allowing liquid into the building is the primary job function. It’s waterproof all by itself, before cladding ever shows up on site.
This layer is made up of flashing tapes, wraps, sheathing (maybe) and sealants (maybe). This layer is pretty hard to screw up. There are only three key principles, make it continuous, make it separate from the cladding, and water runs from top to bottom. This means your weather resistive barrier needs to wrap around details, into window rough openings and connect to something else waterproof at every junction including the top and bottom of the wall. There needs to be a gap between the weather resistive barrier and the cladding to allow drainage and drying. Each part of this layer should overlap something below it, commonly called shingle lapping. If you leave a top edge exposed, water can build on that edge or lose adhesion eventually.
This layer also keeps the wind out. These components can be ‘air barriers’ which prevent wind from blowing through your insulation layer defeating the whole purpose of insulation. To avoid confusion let’s call this a wind barrier not an air barrier. The continuous nature of the weather resistive barrier, and needing to keep out water make this layer a pretty good candidate for an wind barrier.
If you are conventionally insulating your wall (batt insulation between studs), your weather resistive barrier needs to be vapour permeable. Because this layer is on the cold side of the insulation condensation can form and if it’s not a permeable layer this moisture can accumulate and cause mischief. Let it breathe and you won’t have any issues anywhere in New Zealand (or Seattle, Vancouver, or anywhere else that is wet and cold). This works, it works really well in fact, going back several decades in Vancouver and every time you get this layer right everything works great.
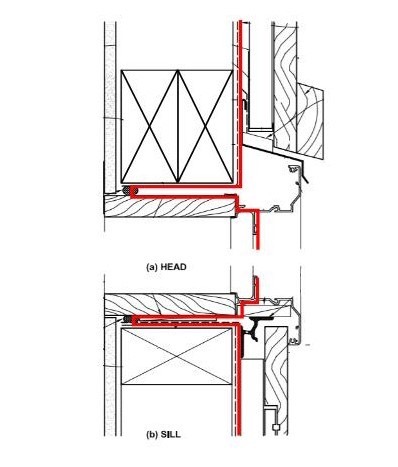
You’ll notice our common window detail requires the timber jamb liner to be a water resistive barrier. Not the greatest idea, it’s not a super durable thing and if water gets to that layer will cause some problems like rotting and leaking. I’m calling this phenomenon WANZ-er (like cancer). And I can do that because WANZ has become WGANZ and is now awesome at technical details.
Thermal Control Layers
Thermal Control Layer: Controls conductive heat loss. This is the fuzzy stuff in the walls that keeps you warm. Insulation works by trapping air, and since air is a pretty good insulator, their isn’t as much heat transfer across the wall than without insulation.
This one is pretty easy to nail too. Don’t fuss too much about getting 100% fill because all you’re doing in this layer is preventing air from circulating within the stud cavity. If there is a small gap it isn’t going to be a tremendous loss in effectiveness. By all means don’t purposely leave gaps, cut insulation to fit, fit it tight, don’t compress it, but don’t lose sleep over small gaps here and there. BRANZ checked this, read the research study and decide for yourself how much effort you want to spend checking 2mm gaps between pieces of insulation. When the steel studs are reducing the effectiveness of your insulation by 50%, your slab edge another 25%, and timber studs and dwangs by 20% the 2% loss due to gaps between insulation isn’t going to make much of a difference.
Keep in mind insulation is the separation from the cold part of the wall and the warm part and also the distinction between where condensation is more likely to occur (cold side) and less likely (warm side). The more insulation you add the colder the cold side gets and the warmer the warm side gets. The colder side being colder means more condensation risk (don’t fear condensation, just design for it).
This whole insulation theory goes straight out the window if air can freely blow through the wall. That’s why you need the Air Control Layer. The Weather Resistive Barrier prevent wind coming from the outside in, and the Air Control Layer prevents warm air from going out. These two are like peanut butter and jelly.
Air Control Layer

Air Control Layer: controls interior air flow and convective heat loss.
Air in your house is typically hotter and wetter than the outside. You spent money buying power to heat that air to a warmer temperature. You added moisture by breathing, showering, cooking and other wet activities you might do in your house. This wet, hot air causes really bad problems when it goes to places it’s not supposed to go.
The first bad thing that happens when air leaves your house is the loss of heat and therefore the loss of money. Heating up air isn’t trivial and can be hundreds of dollars and month.
The air barrier needs to be on the warm side of the insulation otherwise it’s pointless. The whole idea of an air barrier it to prevent warm air from reaching the cold surfaces. If you don’t succeed in doing that, you are inviting condensation and energy losses.
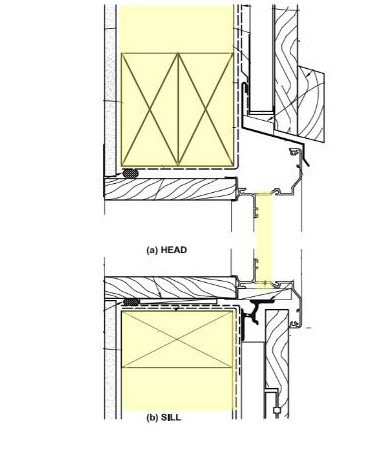
And the air barrier needs to be continuous. You actually have to put sealants between things to make them connected, you can’t just staple them together like the detail above (that’s why there is a gap in the green lines.
Vapour Control Layer (same place as the green layer) Stops diffusion. The most controversial, misunderstood layer of them all. Compared to the Air Control Layer this layer isn’t that relevant. If you aren’t going to bother with the Air Control Layer, don’t bother with this layer either. Although, you could use one product to do both.
This is not the same as the air control layer. Vapour transport is diffusion. Like when you sit on a wet park bench the water diffuses into your pants. Air flow would be someone squirting you with a hose. But they are kind of the same. Both go on the warm side of the insulation, both stop moisture migrating from warm humid places to cold places.
All the science tells us vapour control layers are a good idea, there is a risk in some parts of the country (all of them) with some buildings (most of them) that some walls (most of them) will develop condensation and mould in the walls. I don’t like mould so we design to have very low risk. If you like a bit of condensation and mould in your walls (build character) then you can go ahead and do that, but don’t call us (or do for help) when it goes wrong.
Conclusion
This control layer idea isn’t new to New Zealand, it’s forgotten. This is the basis of E2/AS1, was copied from Canada in the 2000’s (Ontario Rain Penetration Guide) but everyone seems to have forgotten. In the past 12 months, we have produced two new E2 Acceptable Solutions, both of which make no reference to these principles and just making wild guesses whether they will work or not (they won’t). Until we remember what it is we’re doing, we’re just heading towards another decade of bad bad building enclosure design, but this time we should have known better.